Table of Contents
ToggleNothing fuels a home improvement obsession quite like seeing a dated, cramped kitchen turned into an open, light-filled space, or a dingy bathroom transformed into a spa-like retreat. Before and after photos cut through the noise of design theory and show exactly what’s possible with the right plan, materials, and elbow grease. They reveal which updates deliver the biggest visual punch, which shortcuts to avoid, and how far a modest budget can stretch when applied strategically. Whether you’re planning a full gut renovation or a weekend refresh, these transformations offer a reality check and a dose of motivation. Let’s jump into real projects that prove smart remodeling can reshape not just rooms, but how a home functions day to day.
Key Takeaways
- Home remodeling before and after photos reveal realistic project costs, skill levels, and trade-offs that theoretical designs often overlook, helping homeowners make informed decisions about renovation priorities.
- Strategic cabinet painting, new hardware, and lighting upgrades can modernize kitchens for $200–$400 instead of $8,000+ in full replacement costs, making before and after transformations accessible on tight budgets.
- Bathroom makeovers deliver outsized impact through simple swaps like new vanities, updated lighting, and fresh paint, while avoiding costly plumbing relocations keeps renovations practical and achievable for DIYers.
- Before and after remodeling projects succeed by combining quality materials (quartz counters, luxury vinyl flooring, subway tile) with sweat equity, demonstrating that planning, proper sequencing, and safety beat expensive shortcuts every time.
- Document your progress with photos at every stage and confirm structural requirements with engineers before removing walls, as unpermitted work complicates resale and insurance while proper planning prevents costly mistakes.
- Low-impact upgrades like painting brick fireplaces, refinishing hardwood floors, and installing peel-and-stick backsplashes prove that thoughtful before and after transformations can rival high-cost projects when executed with attention to detail.
Why Before and After Projects Are the Ultimate Remodeling Inspiration
Before and after projects do more than showcase finished spaces, they document the messy middle that most design magazines skip. Seeing a rotted subfloor or outdated popcorn ceilings helps DIYers gauge whether a project matches their skill level and budget. These transformations also highlight material choices in context: how subway tile looks against painted shiplap, or whether luxury vinyl plank holds up better than porcelain in a high-traffic mudroom.
They’re also a crash course in what works. A kitchen that swaps upper cabinets for open shelving might look stunning in photos but reveal storage challenges in practice. Bathrooms that gain square footage by stealing closet space show creative layout solutions. Real projects expose trade-offs, cost versus durability, aesthetics versus function, that theoretical designs gloss over.
For homeowners sitting on the fence about a remodel, before and after photos provide the clearest ROI preview. They show whether painting cabinets delivers enough impact to skip a full replacement, or if tearing out a non-load-bearing wall justifies the permit and drywall dust.
Kitchen Transformations: From Outdated to Outstanding
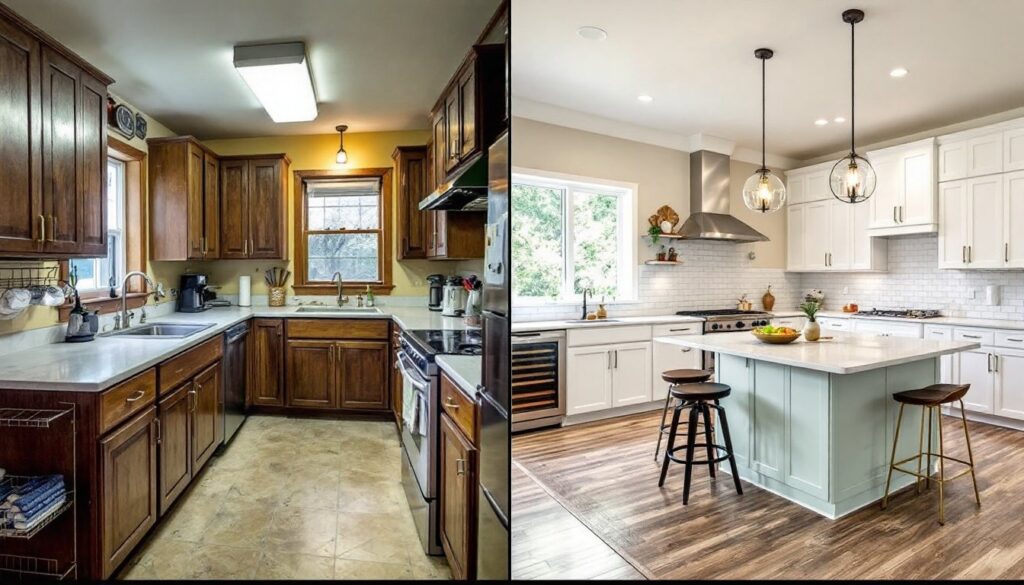
Kitchens anchor most remodeling wishlists, and the before-afters prove why. A common thread: ditching closed-off galley layouts for open sightlines into living areas. One project removed a partial wall (confirmed non-load-bearing by a structural engineer) to connect a 1980s kitchen to the dining room, adding a peninsula with seating for four. The original laminate counters and wire-rack cabinets gave way to quartz countertops and white shaker-style cabinets, instantly modernizing the space.
Another standout swapped dark oak cabinets for two-tone cabinetry, deep navy lowers with white uppers, and replaced a dated tile backsplash with a herringbone-patterned subway tile that added texture without overwhelming the palette. The homeowners tackled cabinet painting themselves using a bonding primer and durable acrylic enamel, saving thousands versus a full replacement. They kept the existing cabinet boxes, upgraded hardware to brushed brass pulls, and installed soft-close hinges.
Lighting upgrades played a huge role across kitchen transformations featured in professional showcases. Recessed LED cans replaced a single fluorescent fixture, paired with under-cabinet strip lights that eliminated shadows on work surfaces. One budget-conscious flip involved painting existing appliances with high-heat appliance epoxy to match the new color scheme, a stopgap that bought time before a full appliance upgrade.
Key Materials That Delivered:
- Quartz countertops (1¼-inch thickness): non-porous, low-maintenance alternative to granite
- Shaker-style cabinet doors: timeless profile that works with modern or traditional aesthetics
- Luxury vinyl plank flooring: waterproof, DIY-friendly, mimics hardwood at a fraction of the cost
- Subway tile (3×6-inch): versatile backsplash option, easy to cut and install
One ambitious project added a structural beam to remove a load-bearing wall, opening the kitchen to a family room. The homeowner hired a structural engineer to spec a laminated veneer lumber (LVL) beam and obtained permits before cutting, a reminder that open-concept dreams often require professional input and aren’t pure DIY territory.
Bathroom Makeovers That Prove Less Is More
Bathrooms deliver outsized impact for their square footage, and the best before-afters show restraint winning over excess. A dated powder room traded busy wallpaper and a pedestal sink for clean white walls, a wall-hung vanity with hidden storage, and large-format porcelain tile (12×24-inch) that made the 40-square-foot space feel double its size. Fewer grout lines mean easier cleaning, a practical win that photos don’t always convey.
A main bath renovation gutted a fiberglass tub-shower combo and installed a curbless walk-in shower with a linear drain and frameless glass panel. The homeowner confirmed proper slope (¼-inch per foot minimum toward the drain) and used a waterproof membrane over cement board before tiling, crucial steps that aren’t visible in the finished photo but prevent costly water damage. The new 2×2-inch mosaic floor tile provided slip resistance while maintaining a modern look.
Another project kept the existing tub and toilet layout, avoiding plumbing relocation costs, but swapped the vanity, mirror, and light fixture. A fresh coat of moisture-resistant paint (satin or semi-gloss sheen) in a light gray brightened the room. The homeowner replaced a single overhead light with a three-bulb vanity bar, dramatically improving task lighting for grooming.
Budget-Saving Moves:
- Refinishing an existing cast-iron tub instead of replacing it (saves $1,000+ versus new tub and installation)
- Installing a prefabricated shower pan rather than a custom mud-set pan (cuts labor hours significantly)
- Choosing ceramic tile over porcelain (easier to cut for DIYers, lower material cost)
- Painting existing cabinets and swapping hardware
One ambitious DIYer added radiant floor heating under new tile, a comfort upgrade that required only a thin electric mat and thermostat. The mat installed over existing subfloor with self-leveling compound, adding minimal height while delivering a luxury feel.
Living Room and Open Concept Renovations
Living rooms rarely need the heavy structural work of kitchens and baths, but the transformations are no less dramatic. One standout project removed carpet to reveal original hardwood floors buried under decades of wear. After sanding (80-grit to 120-grit progression) and refinishing with water-based polyurethane (lower VOC, faster dry time than oil-based), the floors became the room’s focal point.
Another common upgrade: adding built-in shelving around a fireplace. One homeowner framed shallow bookcases using 1×12 nominal pine boards (actual dimension 0.75×11.25 inches) and faced them with trim for a custom millwork look. The project required locating studs with a stud finder, leveling each shelf, and securing with 3-inch screws into framing, basic carpentry that elevated the room’s character.
Open-concept conversions continue to dominate living room remodels. A typical project removed a wall between a formal living room and kitchen, installing a flush beam in the ceiling to carry the load. The homeowner hired an engineer to design the beam and a licensed contractor to install it, then handled drywall finishing and paint themselves. The result: a 600-square-foot combined space that improved sightlines and natural light flow.
Common Living Room Wins:
- Painting dated wood paneling (knotty pine, dark oak) with bonding primer and satin finish paint
- Replacing recessed can lights with integrated LED retrofit kits (better color rendering, lower energy use)
- Installing crown molding and baseboards to add architectural interest
- Swapping builder-grade hollow-core doors for solid-core or five-panel models
One budget-friendly transformation focused solely on paint and lighting. The homeowner painted a feature wall in a deep charcoal gray, installed dimmer switches on all circuits, and added floor lamps to create layered lighting. Total material cost under $400, but the before-after could pass for a five-figure renovation.
Budget-Friendly Before and After Success Stories
Not every transformation requires a home equity loan. Some of the most impressive before-afters lean on sweat equity and strategic material choices. A bedroom redo featured on budget renovation blogs replaced worn carpet with click-lock laminate flooring, a floating floor system that installs over existing subfloor with no glue or nails. The DIY-friendly installation took a weekend, and the material cost ran about $1.50 per square foot.
Another budget win: a laundry room that went from dim and cluttered to organized and bright for under $500. The homeowner painted walls and cabinets, added peel-and-stick vinyl tile (real ceramic would’ve required subfloor work), installed wire shelving, and upgraded to LED bulbs in existing fixtures. The biggest impact came from a folding countertop built from a single sheet of ¾-inch plywood, edged with iron-on veneer, and mounted on brackets.
A living room makeover skipped major construction and focused on surfaces: painting the brick fireplace white (using masonry primer to ensure adhesion), refinishing a thrift-store coffee table, and sewing simple curtain panels. Total spend around $300, but the visual refresh rivaled projects ten times the cost.
Low-Cost, High-Impact Upgrades:
- Painting kitchen cabinets: $200–$400 in materials versus $8,000+ for new cabinets
- Peel-and-stick backsplash tile: under $100 for a standard kitchen, removable and renter-friendly
- Refinishing hardwood floors: $1–$2 per square foot DIY versus $3–$5 professionally
- New cabinet hardware: $3–$8 per pull, instantly modernizes dated cabinetry
- Light fixture swaps: builder-grade fixtures start around $30: swapping takes 20 minutes
One homeowner transformed a dated entryway by building a DIY shiplap accent wall using ¼-inch plywood ripped into 6-inch planks. With a nickel spacer for gaps and a nail gun, the project took a Saturday and cost under $100. The before-after looked like a designer intervention.
How to Plan Your Own Before and After Transformation
Inspired before-afters don’t start with demo day, they begin with measuring, planning, and honest skill assessment. Start by photographing every angle of the space. Take shots from doorways, corners, and standing in the center of the room. These become your “before” reference and help you spot issues you might miss in person, like uneven flooring or poor lighting.
Next, measure everything. Not just room dimensions, but window and door locations, ceiling height, and the distance between outlets and fixtures. Use a laser measure for accuracy, especially in rooms that aren’t perfectly square (most aren’t). If you’re planning layout changes, sketch a scaled floor plan on graph paper or use free software to test furniture and fixture placement before committing.
Critical Planning Steps:
-
Identify structural elements. If you’re removing walls, hire a structural engineer to confirm whether they’re load-bearing. Guessing wrong can cause catastrophic failure.
-
Check permit requirements. Electrical, plumbing, and structural work typically require permits. Call your local building department before starting, unpermitted work complicates resale and insurance claims.
-
Create a realistic budget. Add 20% to your estimated material costs for overruns and surprises. Track every receipt: some energy-efficient upgrades qualify for tax credits.
-
Sequence the work. Demolition comes first, followed by framing, rough plumbing and electrical, insulation, drywall, and finish work. Out-of-order work means tearing out finished surfaces to access hidden systems.
-
Gather the right tools. Borrowing or renting specialized tools (tile saw, paint sprayer, oscillating multi-tool) beats buying for one-time use. Many home centers rent by the day.
-
Prioritize safety. Wear safety glasses, hearing protection for power tools, dust masks (N95 minimum for drywall dust, P100 for lead paint or mold), and work gloves. Keep a first-aid kit and fire extinguisher on-site.
Browse platforms featuring curated home renovation galleries to refine your vision. Save photos that match your style, noting specific materials, colors, and layout tricks. Share these with contractors if you’re hiring out portions of the work, visual references prevent miscommunication.
Finally, document your own progress. Take photos at every stage: post-demo, after framing, once drywall is hung, and throughout finishing. You’ll want the record for future repairs, and your own before-after might inspire someone else’s project down the road.
Conclusion
Before and after transformations prove that thoughtful remodeling, whether budget-conscious or high-end, can fundamentally change how a home lives. The best projects balance aesthetics with function, invest in quality materials where they matter, and respect the limits of DIY skill. Use these examples as a starting point, adapt ideas to your space and budget, and remember that even small upgrades compound into meaningful change when executed well.